Students build their own piece of art using only mathematical functions. Over a month, each design grows from 100–200 equations — and the most reluctant math student usually finishes the proudest. Final pieces go on the gallery wall.
This is one of my favorite projects to assign (and to do myself). Almost every student has voted it one of their favorites. Math directly creates the artwork — and reluctant math students often end up the most engaged.
Math concepts
Functions, made visual.
All topics related to graphing every type of function — including inequalities. Scales naturally with your students' math level.
Linear functions, slope-intercept form
Domain & range in set/interval notation
Parallel and perpendicular lines
Quadratics, cubics, trig functions (advanced)
Art concepts
Design as a discipline.
Students engage with real visual design choices as they translate equations into a composition that goes on the wall.
Soft and hard colors, complementary palettes
2D/3D design on flat surfaces
Graphic design and modeling
Depth and visual hierarchy
PBL outcomes
Highest autonomy. Real artifact.
Most artwork ends up at 100–200 equations. The beauty: students don't stop until they're satisfied with their own piece.
Highest degree of student autonomy
Works at every math level
Tangible artifact for the gallery wall
Optional themes (skyline, dream house, etc.)
Supplies
Materials for any budget.
The project runs at zero cost — but a tangible final product takes it to the level where students will be proud to showcase their work. When they know it'll be displayed, they work harder.
For linear-functions projects
Multi-colored embroidery thread (24-skein set)$10 / set
Large-eye blunt needles (pack of 9)$5
20×30" black foamcore boards (gridded back)$50–75 / 10
Alternate: 1' × 2' × ¼" birch plywood$20 / 4
For non-linear projects
Pre-cut mat boards 16×20 with 11×14 opening$40 / 20
11×14 color printing$0.20 each
Tape adhesives (6-pack)$10
For every Graf(It) Art project
Notebooks/binders for saving drafts & documentationFree
Computers + Desmos account (for the digital version)Free
Graph paper — print custom sheets from incompetechFree
Straight-edge (ruler) for first draftsFree
Colored pens for drafting the colored version~$5
The curriculum
Three parts. One month.
The project moves from a hand-drawn sketch to a fully-derived set of equations to a physical showpiece. Each part has student-facing directions and a teacher's guide.
Part 01~1 week
The drawing(s).
For students
Create a drawing using only linear functions. Use a straight edge for all lines. Choosing endpoints at integer coordinates will make the math easier later.
Your artwork must satisfy the following:
At least 10 positively-sloped lines
At least 10 negatively-sloped lines
At least 10 horizontal lines
At least 10 vertical lines
At least 2 pairs of parallel lines
At least 2 pairs of perpendicular lines
Label all points (A–Z, then AA–AZ, then BA–BZ, etc.)
Higher-level math? Determine the appropriate number of quadratic, cubic, trigonometric functions, etc.
For teachers
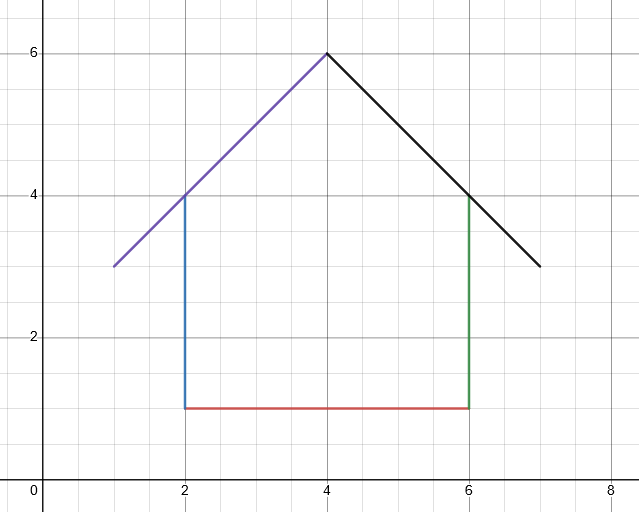
Decide whether you want a theme. First time? "City skyline" or "dream house" are easier to carry out. Choose a pedagogy for each concept and scaffold accordingly. Show how concepts apply directly using a simple example — like this house:
Sample house — shows positive, negative, horizontal, and vertical line types.
Other things to standardize:
Function form (standard, slope-intercept, etc.)
Domain/range notation (set, interval, etc.)
Domain and range of the working graph paper
Always have students save drafts. Even if they change the image completely, it's part of the process.
Part 02~3 weeks
The math and the art.
For students
For each line you drew:
Derive the equation in slope-intercept form. Example: The equation for the line connecting Point A and Point B is $y_{AB} = 3x - 3$.
Determine the domain. For vertical lines, the range. Use set notation. Example: $y_{AB} = 3x - 3$ where $\{4 < x < 8\}$.
Save all your work, showing how each equation was derived. Example:
Worked example
$$ A(2,3) \quad B(4,9) $$
$$ m = \frac{9-3}{4-2} = \frac{6}{2} = 3 $$
$$ \begin{align*} (2,3) \ \ y &= 3x + b \\ 3 &= 3(2) + b \\ 3 &= 6 + b \\ -3 &= b \\ y_{AB} &= 3x - 3 \end{align*} $$
For the 2 pairs of parallel and perpendicular lines, prove they're parallel/perpendicular algebraically AND graphically.
Use Desmos to check your final equations. If a line graphs wrong, check your work, fix it, regraph. Type the final list of equations into a chart grouped by type.
For teachers
Lessons depend on the math level. Scaffold well so students can derive correct equations. This is the heart of the project — and takes the longest. Have students keep all work and present it organized.
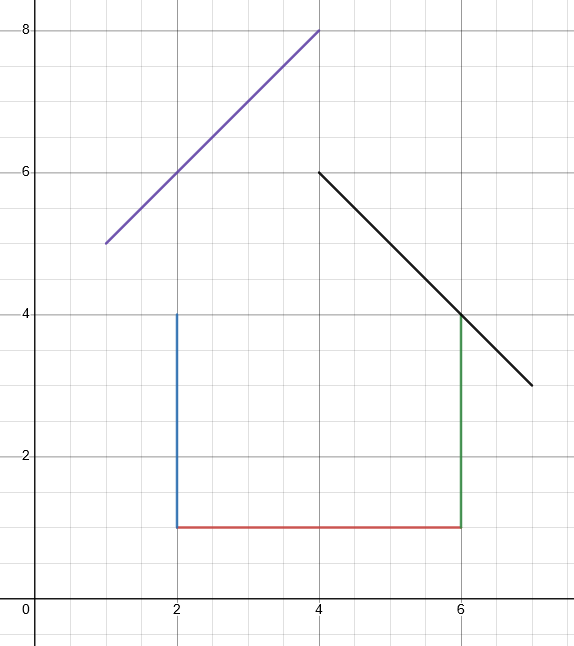
The best part about Desmos: it saves you from checking every line. When a wrong line appears like this:
A wrong line on Desmos — students automatically look at their work and fix it themselves.
This is what makes the project special — students take responsibility for fixing their own mistakes, unlike traditional homework where most students don't care.
Part 03Final week
The showpiece.
For students
You have the digital version. You have organized math work. You have drafts. Now make the showpiece:
Create a "colored" version of your artwork — decide on the colors for your lines. Print a copy from Desmos and trace it with colored markers/pens/crayons.
Using the grid on the back of the 20×30" black foamcore, lightly pencil the negative of your artwork. (When threaded, the front will be the positive.)
Use the blunt needle to punch starter holes at each point.
Thread your artwork using the colored embroidery threads following your colored draft. Reuse strings across multiple lines — the back doesn't have to look pretty.
Organize all math work into a folder/binder with your hand-drawn drafts.
Title your artwork. Write the title, your name, and the date on the back.
For teachers
The black-foam + thread approach is for projects with only linear functions. For higher-level math, print an 11×14 colored Desmos export and frame it with a 16×20 mat board (11×14 opening). Tape the print to the back of the mat.
Display student work in your classroom or hallways. At year's end, display the projects in a gallery with everything else you've done.
Grading
A 200-point rubric.
Adjust the weights and rules to fit your class. The rubric below is what I've used — feel free to add, remove, or reweight.
50 pts
The drawings
Points deducted for any of the following:
Missing hand-drawn drafts
Drafts not on assigned graph paper
Not using a straight-edge
Missing labels on points
Fewer than 10 horizontal lines
Fewer than 10 vertical lines
Fewer than 10 negatively-sloped lines
Fewer than 10 positively-sloped lines
Fewer than 2 pairs of parallel lines
Fewer than 2 pairs of perpendicular lines
100 pts
Equations + the art
Points deducted for any of the following:
Missing or incomplete Desmos graph
Hand-drawn graph differs from Desmos artwork
Missing or incomplete list of equations
Equations in the wrong form or notation
Domain/range in the wrong notation
Equations not categorized by type
Work not organized in a table
Missing/incomplete work for non-horizontal/vertical lines
50 pts
The showpiece
Points deducted for any of the following:
Final showpiece missing or incomplete
Missing hand-drawn colored artwork
Hand-drawn, digital, and showpiece don't match
Threading is not secure
Missing name, title, or date on artwork
Missing name, title, or date in folder
Written/typed work not organized in folder/binder
Student work
What this looks like in real classrooms.
Part of learning is seeing what exemplary work looks like. Click any tile to view the full piece, or browse the linked notebooks below for the math behind it.
Change anything here to fit your class. Got ideas for how to expand it? Tell me. Want a printed version? There are Pre-Algebra and Algebra editions on Amazon.